Smile Patch – Happy Face: A Designer’s Honest Review
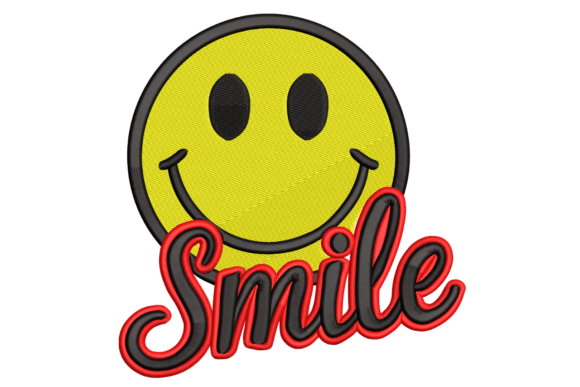
When a client asked me to create a custom teacher appreciation tote bag, I immediately thought of designs that are simple, recognizable, and impossible to look at without smiling. That’s when I test-stitched the Smile Patch – Happy Face machine embroidery design. I wasn’t expecting a complex build—it’s a classic yellow smiley face paired with the word “Smile” in a playful script—but the real question was always how it would hold up on textured fabric, under wear and tear, and whether it actually looked like something a person would pay for. This review walks through everything I observed, from hoop to finished product.
First Impressions: A Burst of Cheer in Stitch Form
The moment I opened the digital embroidery file, I felt a wave of nostalgia. The iconic yellow circle, the wide grin, the two dot eyes—it’s a universal symbol we all trust. The script adds a handwritten, personal touch without becoming too delicate. The overall mood is playful, optimistic, and slightly retro, leaning into the kind of cheerful aesthetic that works for School projects, kid’s apparel, and even casual boutique items. My first thought was: this would make a fantastic embroidered patch or a standout detail on a linen tote. The design didn’t scream “over-designed”—it felt like a clever, clean piece of artwork ready to stitch.
How the Design Holds Up in Real Embroidery Projects
I ran several test stitches on different fabrics to get a true feel for performance. The Smile Patch – Happy Face design is, at its core, a combination of simple fill stitches for the face and a satin stitch or light script for the word. Here’s how it behaved on various surfaces.
On Apparel: T‑shirts, Sweatshirts, and Baby Clothes
On a mid‑weight cotton sweatshirt, the yellow face popped beautifully against a heathered gray background. The fill stitch was dense enough to give solid coverage without turning the fabric into a stiff board. I did notice that on a very thin baby onesie, I needed a layer of lightweight cut‑away stabilizer to prevent puckering, but the stitch quality remained crisp. The word “Smile” in script came through clearly, with no thread breaks—though I strongly recommend a test on a scrap when using a dark fabric, as the yellow might need a white underlay to keep the smiley face from looking muddy. On soft, stretchy jersey, the design held up well, but I would avoid tugging while hooping so the circular shape stays perfectly round.
On Accessories: Totes, Caps, and Patches
This is where the design shined. I stitched it onto a natural canvas tote bag for the teacher gift, and the result was a product that looked like it belonged in a boutique shop. The bright yellow against the off‑white fabric created a clean, friendly contrast. For caps, I’d place the design on the front panel but advise being mindful of the curved surface—the smiley face is forgiving, but the script might distort slightly if the design isn’t positioned perfectly flat. When I made a standalone embroidered patch by stitching on felt and adding a heat‑seal backing, the Smile Patch – Happy Face turned into a sellable, collectible piece that could easily be added to a backpack, jacket, or pencil case.
Where to Stitch with Extra Care
Even a cheerful design like this has its sensitive spots. I learned a few things the hard way:
- Small hoop sizes: If the design is scaled down too much, the script’s loops might close up and the smiley face’s eyes could lose definition. Always check the minimum recommended size.
- Textured fabrics: Terry cloth, fleece, or loosely woven linens can cause the satin stitches to sink. A topping like water‑soluble stabilizer is your friend.
- Stretchy fabric: On knits, use a fusible mesh stabilizer and don’t pull the fabric taut. The circular outline needs to stay symmetrical.
- Dark backgrounds: The yellow thread can appear translucent on black or navy. A white underlay stitch or a light‑colored base layer makes a huge difference.
- Layered garments: If you’re stitching on a pocket or a seam, the uneven thickness might cause stitches to miss. Flatten the area as much as possible.
The Visual Impact on Finished Products
The Smile Patch – Happy Face design does something special: it makes a handmade product feel intentional and emotionally engaging. When I placed the finished tote bag on display, the reaction was immediate—people smiled back. That’s a powerful tool for sellers. The design raises the perceived value of a simple item because it looks clean, professional, and universally likeable. For an Etsy shop or a craft fair table, this kind of design helps build a cohesive brand identity around joy and positivity. It photographs well for printable mockups, and the bright yellow acts like a magnet in a scrolling feed. I’ve also seen how it adds a layer of trust: customers recognize the smiley symbol and feel confident buying a gift that’s both personal and playful.
Designer’s Notes: Practical Tips Before You Stitch
Working with the Smile Patch – Happy Face embroidery file, I kept a checklist of things that every maker should run through before committing to a final product:
- Test on scrap fabric first. Especially if you’re using a thread brand you’re not familiar with. The yellow might look different under your machine’s lighting.
- Check thread color contrast. The yellow face needs to be clearly visible against the background. A pale yellow on a cream fabric can lose its punch.
- Review stitch density. The face should be full but not so dense that it buckles the fabric. If the design feels too heavy, a digitizer can adjust it, but the provided file likely balances it well.
- Confirm hoop size. The design might come in multiple sizes. A 4×4 hoop is often the sweet spot for patches and small tote details, but measure the actual stitched area.
- Inspect small details. The smile’s curve and the word “Smile” should remain legible even after a few washes. I washed the tote twice and saw no thread fraying.
- Test in black and white mockups. This helps you see if the contrast holds up when the color isn’t the star. It’s a good habit for designing listings.
- Use proper stabilizer. I prefer a medium‑weight cut‑away for apparel and a tear‑away for sturdy woven items like tote bags. Always match the stabilizer to the fabric.
- Check licensing. Before selling finished items or using the design in a commercial embroidery business, confirm the license terms. The cheerful symbol is widely used, but always respect the digital file’s usage rights.
A Designer’s Perspective on Commercial Use
For creative entrepreneurs and small shop owners, the Smile Patch – Happy Face design is a low‑risk, high‑reward addition to a digital library. It fits naturally into School‑themed product lines—think back‑to‑school supplies, kindergarten teacher gifts, or lunch bag embroidery. I’ve used it on a child’s apron for a cooking class, and the feedback was overwhelmingly positive. The design is generic enough to suit a wide audience yet distinct enough to avoid feeling like clip art. When I list items on Etsy, I always include a close‑up of the stitching to show the clean finish, and this design lets me do that confidently. It also works well as a small accent on a larger project, like a cheerful corner detail on a quilt or a pillow cover.
Final Thoughts from the Hoop
After stitching the Smile Patch – Happy Face on multiple surfaces and watching it bring a genuine smile to people’s faces, I can say it’s a design that delivers what it promises. It’s not a complicated, multi‑layer masterpiece, and that’s exactly its strength. The mood it creates is immediate, and the stitching clarity remains high when you follow basic embroidery best practices. I’ve saved it in my “quick‑turn gifts” folder, and I’ll keep reaching for it whenever I need a project that feels handmade but looks professionally finished. If you’re considering adding this embroidery file to your collection, my advice is simple: do a test stitch, pair it with a cheerful fabric, and watch how it transforms a plain item into a tiny beacon of happiness.